How to Set Up a Facebook Ad Funnel for eCommerce Products
What is a Facebook Ad Funnel?
A Facebook Ad Funnel is a marketing strategy for e-commerce brands that guides potential customers through stages, from awareness to purchase, using Facebook ads. With nearly 3 billion users worldwide, Facebook is one of the most popular social media platforms. A Facebook ad funnel is a “path” that pilots users to commit an action desired by the ad creator. (In this case, the desired action is making a purchase.)
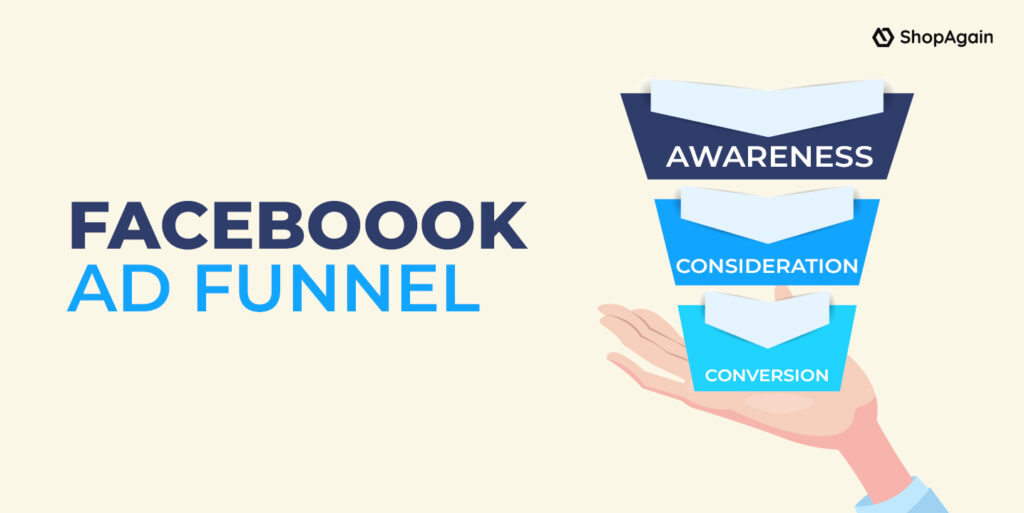
Mainly, the ecommerce Facebook Ads funnel consists of three stages:
- Awareness: Top of the funnel (TOFU)
- Consideration: Middle of the funnel (MOFU)
- Conversion/Decision: Bottom of the funnel (BOFU)
The idea behind a Facebook Ads sales funnel is to first, create awareness about your product among those who do not know about it, then have them visit your website to learn more about your product and consider buying it. Once this is done, the last ad that they see is the one that convinces them to make a purchase just in case they did not already do so while browsing your website. We will read more about these stages below.
Steps to Setting Up an Ad Funnel on Facebook
Let’s look into how to create facebook ads funnel. There are several Facebook ads funnel strategy that drive sales. But it is highly unlikely that a person will buy your product or service based solely on seeing your ad for the first time. Ad funnels act as mediators that help people engage with your brand. It is crucial to properly set up facebook full funnel strategy, including learning how to set up e-commerce on Facebook.
Step 1: Integrate your eCommerce Site with Facebook
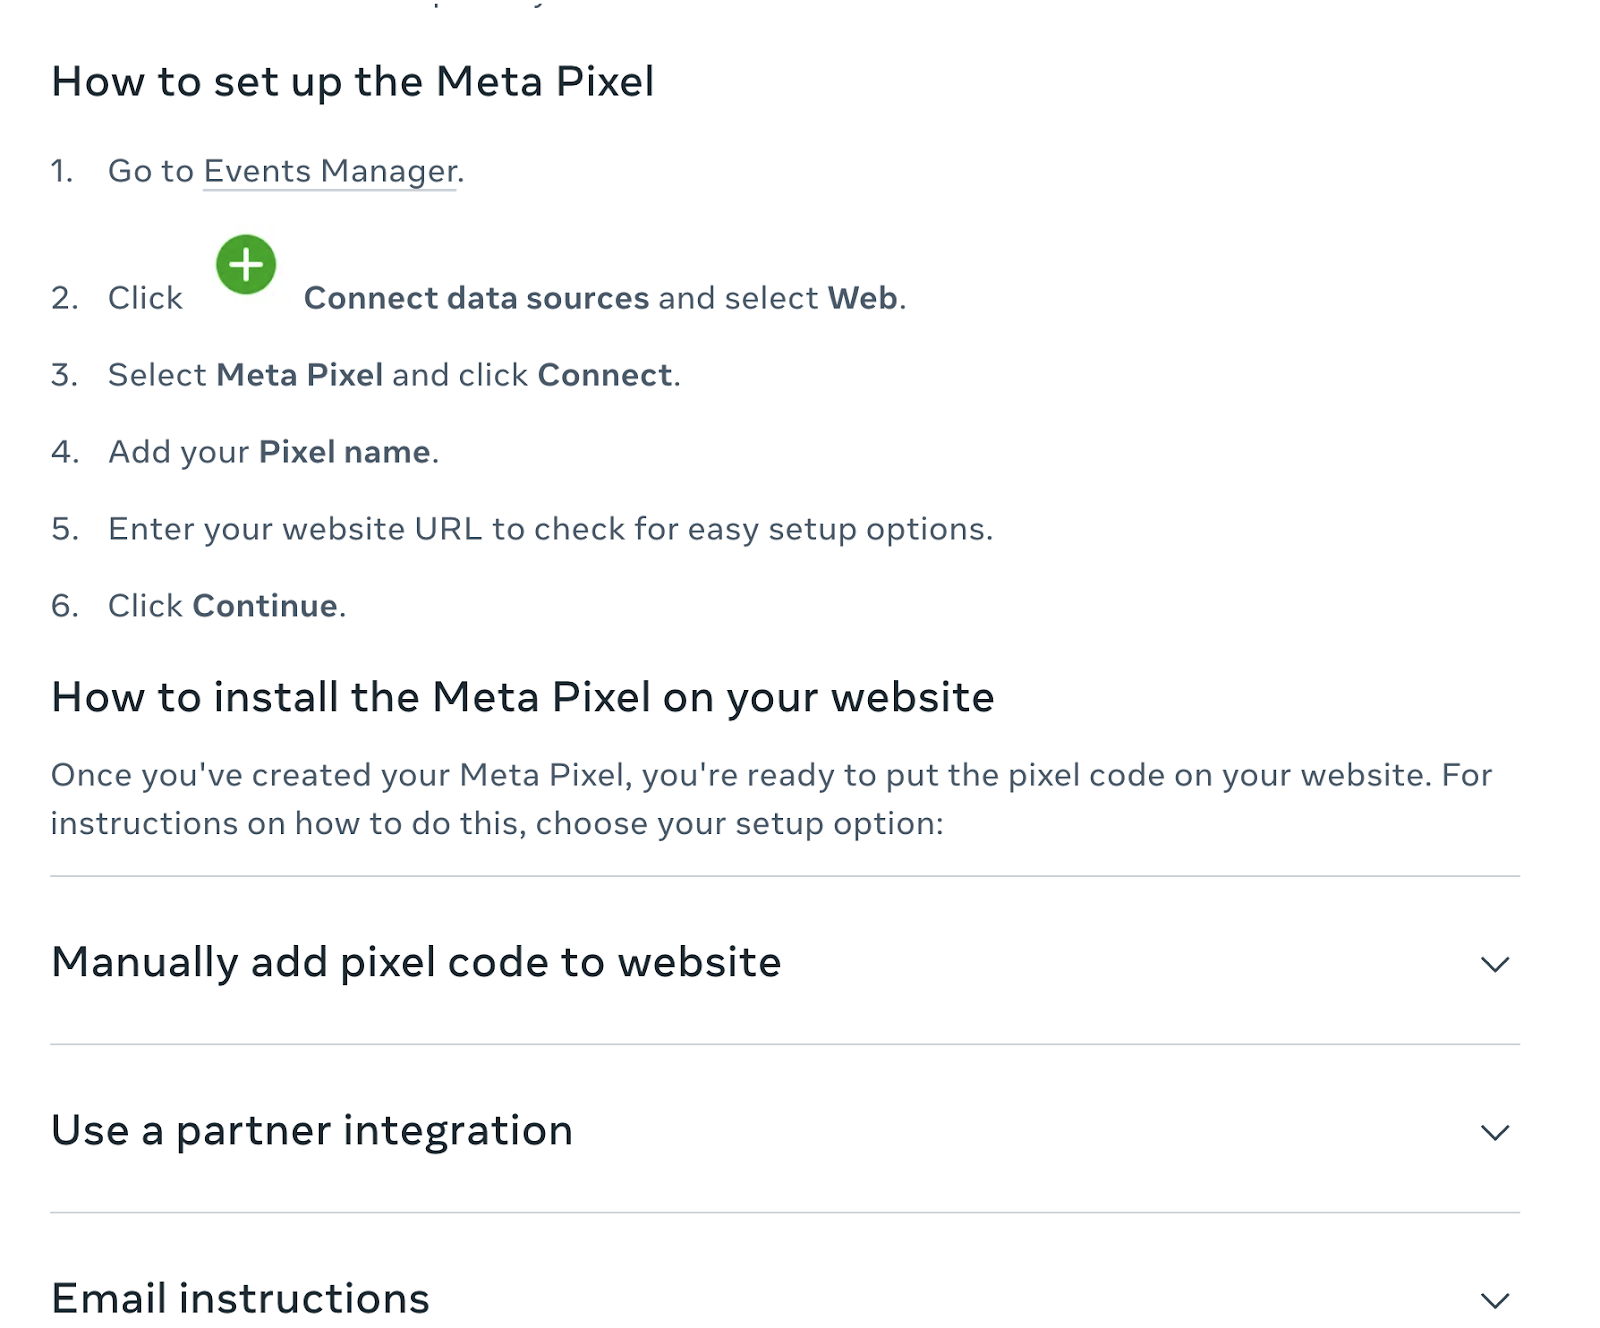
Before setting up a facebook funnel ads strategy, check that your eCommerce site links to Facebook. First, make sure your website has the Facebook pixel installed. The Facebook pixel is code added to your website’s backend to monitor site visitors. The pixel has two key functions. It tracks user behavior, enabling you to retarget visitors using Facebook ads based on their actions. Additionally, it reveals the success of your ads by displaying conversion rates, so install it prior to running Facebook ads.
Lastly, establish and test conversion tracking to identify high-performing ads and underperforming ones. Most eCommerce platforms make setting up conversion tracking easy. Just copy your Facebook pixel ID and paste it into Shopify, WooCommerce, or your preferred platform. Read more here.
Step 2: Set Up your Target Audience
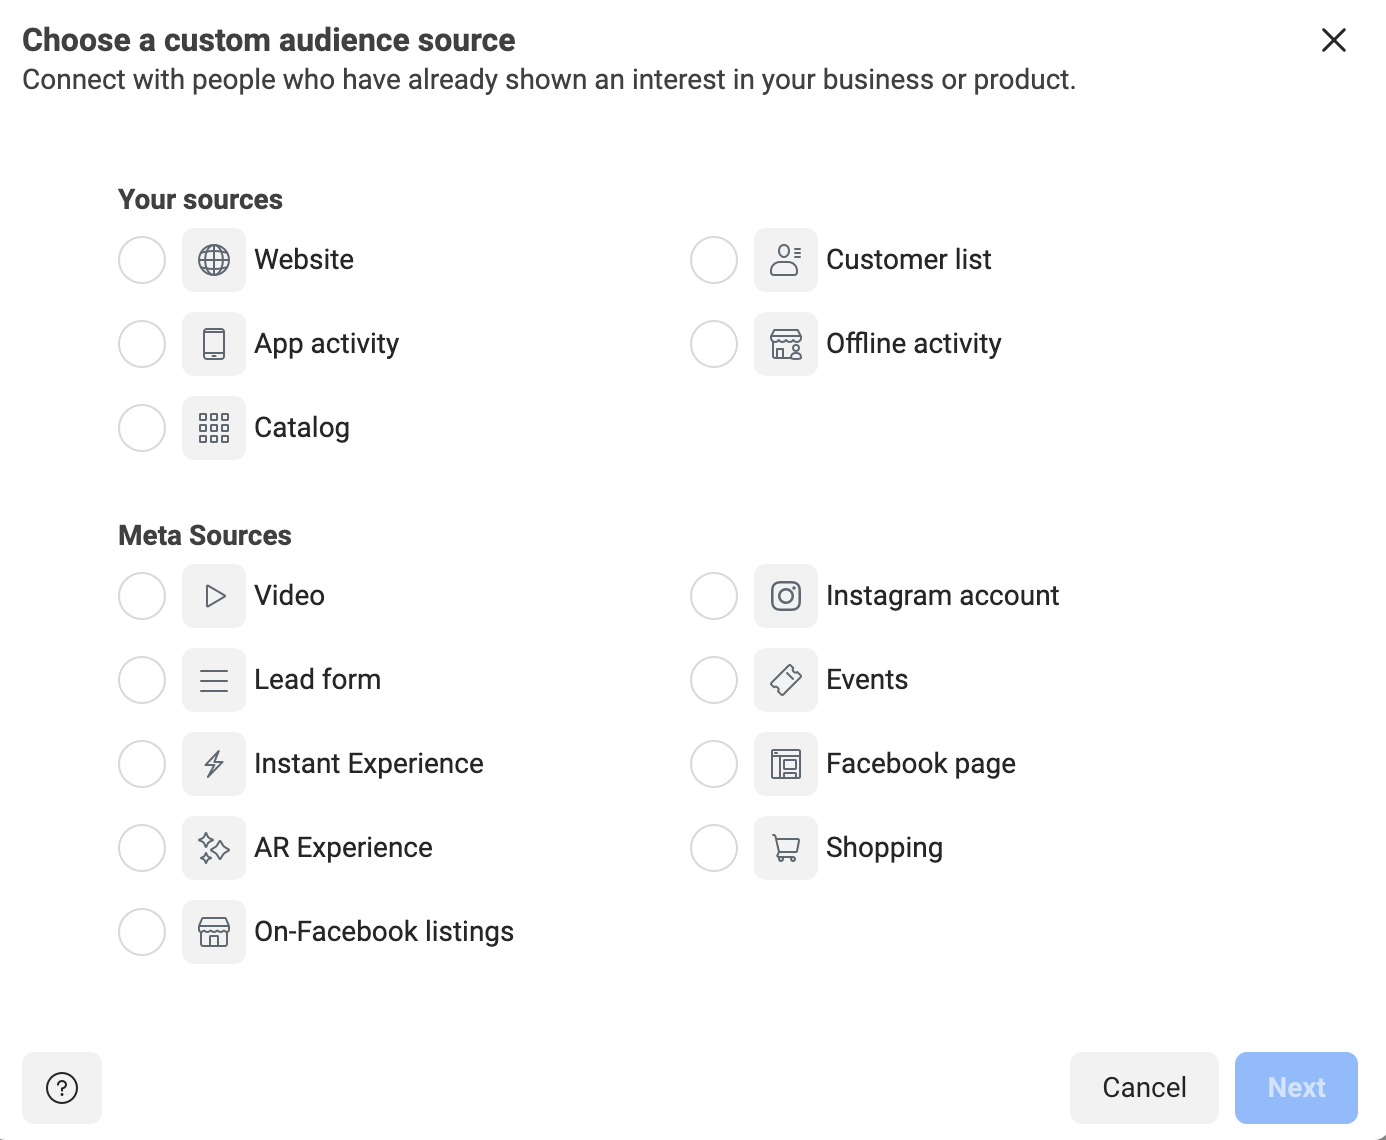
After connecting your eCommerce site to Facebook, form custom audiences for targeting. Create these audiences using your email list, interactions with your business, and website visitors.
Target these people in the middle and bottom of the facebook funnels, as they are already engaged with your business and browsing your products. These audiences will generate revenue.
Remember that the effectiveness of audiences depends on the quality and relevance of the data you provide. Keep your audience criteria up-to-date and continuously refine it to improve your ad targeting. Let’s explore various types of Facebook audiences to create for your e-commerce brand.
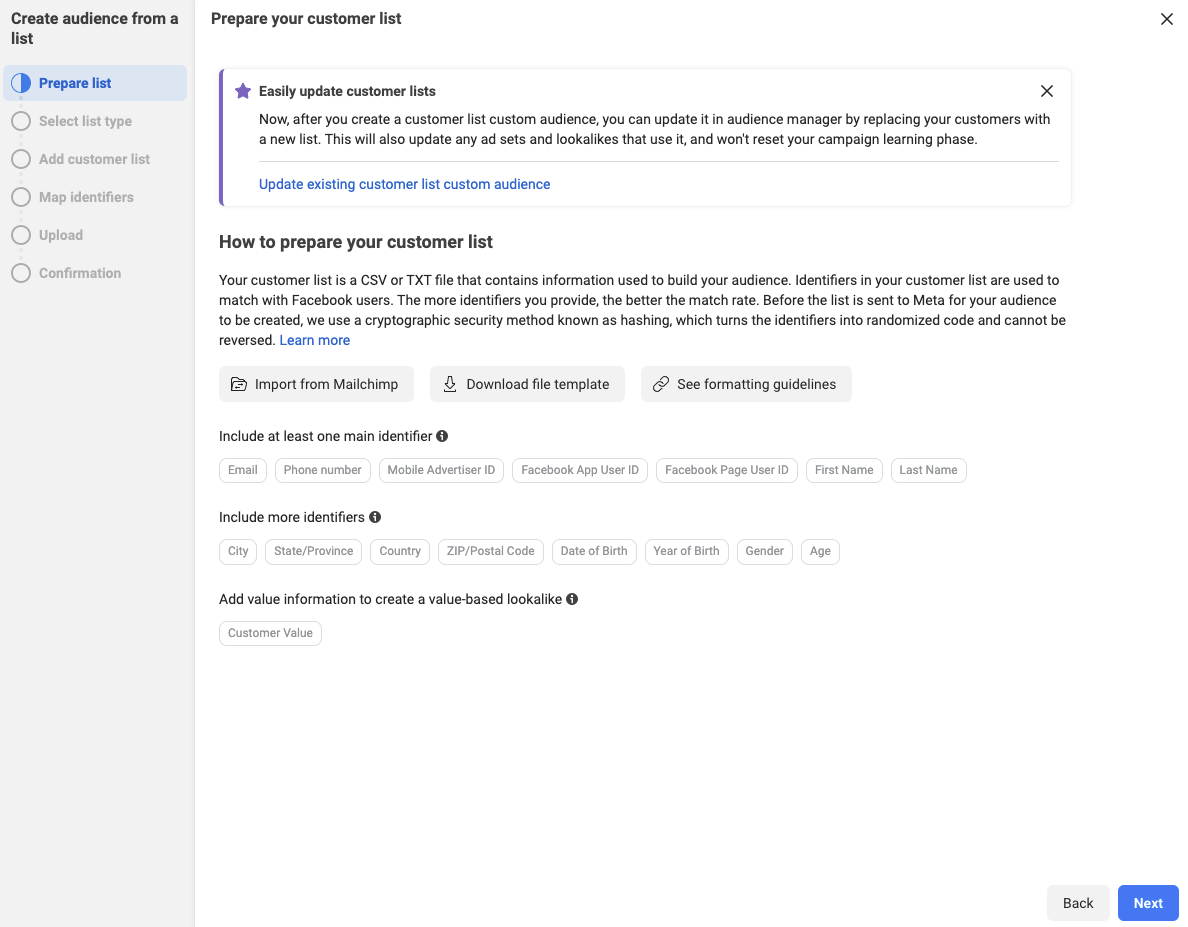
Custom Audience of Email Subscribers and Purchasers
Creating a Custom Audience of Email Subscribers and Past Purchasers on Facebook Ads involves using your existing customer data to target specific individuals who have engaged with your business. Follow these steps to create a Custom Audience:
Prepare your data:
- Export a list of email subscribers and purchasers from your email marketing platform or e-commerce system.
- Ensure the data is in a CSV or TXT format, with each email address on a separate line.
- Remove any duplicates, invalid, or outdated email addresses from your list.
Log in to Facebook Ads Manager:
- Go to https://www.facebook.com/adsmanager.
- Log in with your Facebook account with administrative access to your business’s ad account.
Access Audiences:
- Click on the menu icon (three horizontal lines) in the top-left corner.
- Select “Audiences” under the “Assets” section.
Create a Custom Audience:
- Click on the blue “Create a Custom Audience” button.
- In the “Create a Custom Audience” window, select “Customer List.”
Upload your data file:
- Click “Add from your own list.”
- Choose “Upload File” and click “Next.”
- Click “Choose File” and navigate to your prepared CSV or TXT file containing the email addresses.
- Click “Open” to upload the file.
- Give your Custom Audience a descriptive name (e.g., “Email Subscribers and Purchasers”) and add a description, if desired.
- Click “Next.”
Map data identifiers:
- Review the data identifiers to make sure they match the data you’ve uploaded (e.g., “Email”).
- If Facebook Ads Manager does not detect the correct identifiers automatically, manually select the appropriate ones.
- Click “Upload & Create.”
Wait for the audience to populate:
- Facebook will process your data and match it to user profiles.
- This process may take up to 24 hours, so be patient.
- You’ll receive a notification once your Custom Audience is ready to use.
Use your Custom Audience in an ad campaign:
- When creating a new ad campaign, navigate to the “Ad Set” level.
- In the “Audience” section, click on “Use a Saved Audience.”
- Choose the Custom Audience you created from the list.
- Continue setting up your ad campaign as usual.
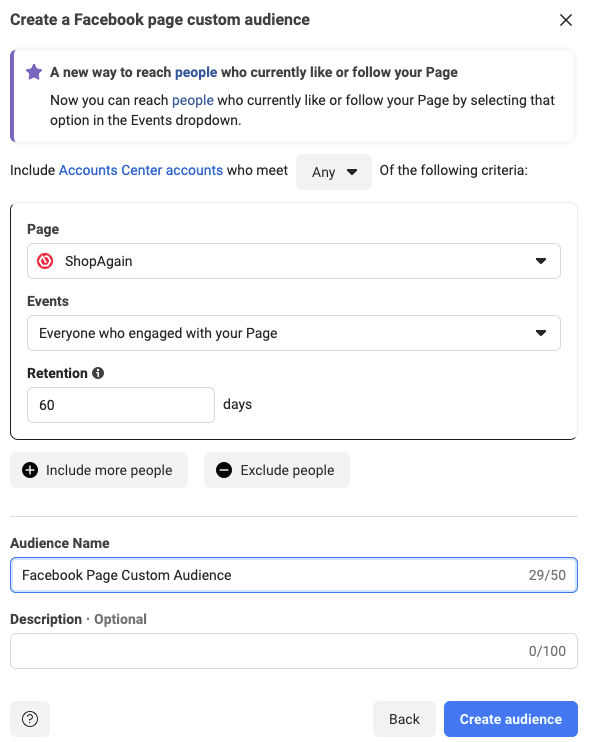
Facebook Page Custom Audience
A Facebook Page Custom Audience allows you to target people who have interacted with your Facebook Page or its content. Here are the steps to create a Facebook Page Custom Audience:
Log in to Facebook Ads Manager and access Audiences, same as before.
Create a Custom Audience:
- Click on the blue “Create a Custom Audience” button.
- In the “Create a Custom Audience” window, select “Facebook Page.”
Configure audience criteria:
- Choose the Facebook Page you want to create the audience from using the “Select a Page” dropdown.
- Click on the “Everyone who engaged with your Page” dropdown to view additional engagement options:
– Anyone who visited your Page
– People who engaged with any post or ad
– People who clicked on any call-to-action button
– People who sent a message to your Page
– People who saved your Page or any of its posts
- Select the desired engagement criteria for your Custom Audience.
Set the time frame:
- Choose the number of days people will remain in your audience after they’ve interacted with your Page. You can select up to 365 days.
- Note that the audience will be continually updated as new people meet the selected criteria within the chosen time frame.
Name your Custom Audience:
- Give your Custom Audience a descriptive name (e.g., “Page Engagers – Last 30 Days”) and add a description, if desired.
Create the Custom Audience:
- Click the “Create Audience” button.
- Facebook will process your request and create the Custom Audience.
Wait for the audience to populate:
- The Custom Audience may take a few minutes to a few hours to populate.
- You’ll receive a notification once your Custom Audience is ready to use.
Finally, you can use your Custom Audience in an ad campaign.
By following these steps, you can create a Facebook Page Custom Audience to target people who have interacted with your Page, helping you reach an audience that is more likely to engage with your ads.
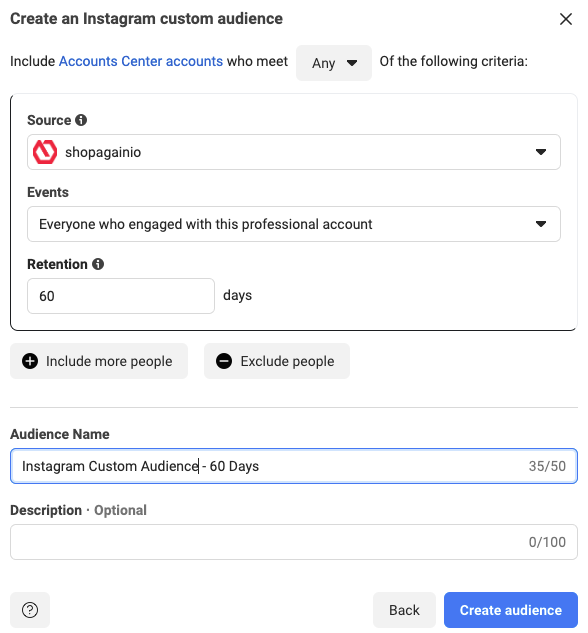
Instagram Business Profile Custom Audience
Creating an Instagram Business Profile Custom Audience allows you to target people who have interacted with your Instagram business account or its content. Here are the steps to create an Instagram Business Profile Custom Audience:
Log in to Facebook Ads Manager and access Audiences, same as before.
Create a Custom Audience:
- Click on the blue “Create a Custom Audience” button.
- In the “Create a Custom Audience” window, select “Instagram Account.”
Configure audience criteria:
- Choose the Instagram business account you want to create the audience from using the “Select an Instagram Account” dropdown.
- Click on the “Everyone who engaged with your business” dropdown to view additional engagement options:
– Anyone who visited your business profile
– People who engaged with any post or ad
– People who sent a message to your business profile
– People who saved any of your posts or ads
- Select the desired engagement criteria for your Custom Audience.
Set the time frame:
- Choose the number of days people will remain in your audience after they’ve interacted with your Instagram business account. You can select up to 365 days.
- Note that the audience will be continually updated as new people meet the selected criteria within the chosen time frame.
Name your Custom Audience:
- Give your Custom Audience a descriptive name (e.g., “Instagram Engagers – Last 30 Days”) and add a description, if desired.
Create the Custom Audience:
- Click the “Create Audience” button.
- Facebook will process your request and create the Custom Audience.
By following these steps, you can create an Instagram Business Profile Custom Audience to target people who have interacted with your Instagram account
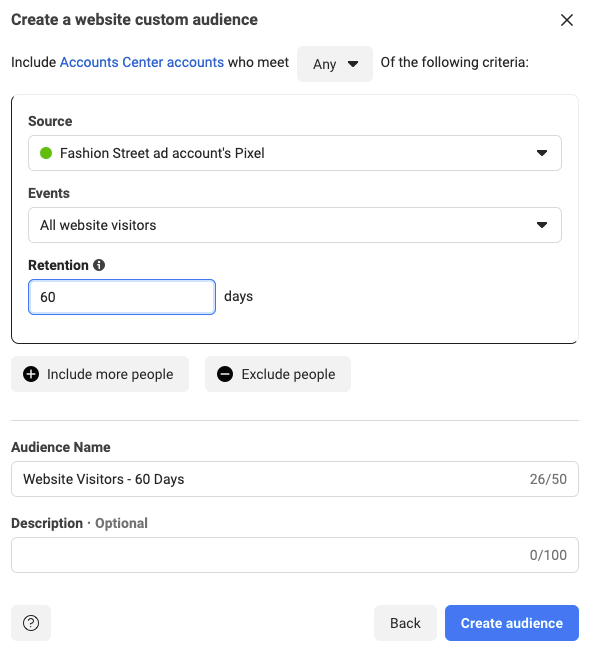
Custom Audience of Website Visitors
Creating a Custom Audience of Website Visitors on Facebook Ads involves targeting users who have visited or interacted with your website. To create this audience, you’ll need to set up the Facebook Pixel on your website first. Once you have the Pixel installed, follow these steps:
Set up the Facebook Pixel:
- Go to https://www.facebook.com/events_manager.
- Log in with your Facebook account that has administrative access to your business’s ad account.
- Click “Get Started” with the Facebook Pixel, and follow the instructions to create and install the pixel on your website.
Verify the Facebook Pixel:
- Ensure that the Pixel is correctly installed and tracking events on your website.
- Use the “Test Events” tool in the Events Manager or the Facebook Pixel Helper browser extension to confirm proper installation.
Log in to Facebook Ads Manager and access Audience section.
Create a Custom Audience:
- Click on the blue “Create a Custom Audience” button.
- In the “Create a Custom Audience” window, select “Website.”
Configure audience criteria:
- Choose the Facebook Pixel you want to create the audience from using the “Select a Pixel” dropdown.
- Click on “All website visitors” to view additional website activity options, such as:
– People who visited specific web pages
– People who visited specific web pages but not others
– People who spent the most time on your website
- Select the desired website activity criteria for your Custom Audience.
Set the time frame:
- Choose the number of days people will remain in your audience after they’ve visited or interacted with your website. You can select up to 180 days.
- Note that the audience will be continually updated as new people meet the selected criteria within the chosen time frame.
Name your Custom Audience:
- Give your Custom Audience a descriptive name (e.g., “Website Visitors – Last 30 Days”) and add a description, if desired.
Create the Custom Audience:
- Click the “Create Audience” button.
- Facebook will process your request and create the Custom Audience.
Once the above audience is populated, you may use it in your ad campaigns.
By following these steps, you can create a Custom Audience of Website Visitors on Facebook Ads, allowing you to retarget visitors and improve your overall marketing results.
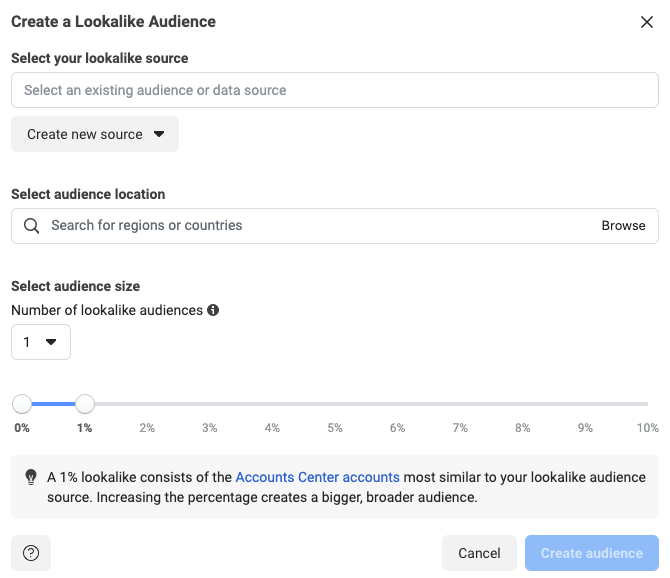
Lookalike Audience of Past Purchasers
Creating a Lookalike Audience of Past Purchasers on Facebook Ads allows you to target users who are similar to your existing customers, increasing the likelihood of reaching potential new customers. First, you need to create a Custom Audience of past purchasers. Then, you can create a Lookalike Audience based on that Custom Audience.
Prepare your data:
- Export a list of past purchasers from your e-commerce system or CRM.
- Ensure the data is in a CSV or TXT format, with each identifier (email, phone number, etc.) on a separate line.
- Remove any duplicates, invalid, or outdated information from your list.
Log in to Facebook Ads Manager and access Audiences
Create a Custom Audience of past purchasers:
- Follow the steps provided in a previous answer to create a Custom Audience of Email Subscribers and Purchasers, but only use the data of past purchasers.
Create a Lookalike Audience:
- Find the Custom Audience of past purchasers you just created in the “Audiences” section.
- Click on the checkbox next to the audience’s name.
- Click on the “Actions” dropdown and select “Create Lookalike.”
Configure Lookalike Audience settings:
- Choose the target country or countries for your Lookalike Audience.
- Select the desired audience size using the slider or by entering a percentage value (1% being the most similar to your Custom Audience and 10% being the least similar).
- You can create multiple Lookalike Audiences with different audience sizes at once by clicking “Add Another” and repeating the process.
Name your Lookalike Audience:
- Give your Lookalike Audience a descriptive name (e.g., “Lookalike – Past Purchasers – 1%”) and add a description, if desired.
Create the Lookalike Audience:
- Click the “Create Audience” button.
- Facebook will process your request and create the Lookalike Audience.
As usual, wait for the audience to populate and you are good to use to in your ad campaigns.
By following these steps, you can create a Lookalike Audience of Past Purchasers on Facebook Ads, helping you reach potential new customers who share similarities with your existing customers.
Read more about creating Lookalike Audiences here.
Step 3: Create a Top-of-Funnel Campaign for Product Awareness
A top-of-the-funnel ad targets new potential customers to raise awareness of your brand and products. As the first stage in the customer journey, it emphasizes wide reach and brand visibility. At this stage, the audience viewing these ads is not looking to make a purchase from you. You are looking to turn strangers into prospects. Since the audience is unfamiliar with your product, gently introduce your brand without being forceful or pushy.
Videos are effective for this stage, but remember, you’re targeting unfamiliar audiences. To maintain their attention, skip lengthy introductions and avoid using the same shot for over 3 seconds. Start with people talking or moving, include video overlays, and use jump cuts and b-roll.
To create a good top-of-the-funnel ad for an e-commerce brand:
- Target a broad audience: Use interest-based targeting or Lookalike Audiences to reach people who are likely to be interested in your niche but haven’t interacted with your brand yet.
- Craft a compelling message: Focus on the unique selling points of your brand or products, highlighting benefits and features that resonate with your target audience. Use clear and concise language.
- Use eye-catching visuals: Utilize high-quality images, videos, or carousel ads that showcase your products or brand’s lifestyle. Ensure your visuals are consistent with your brand identity.
- Include a clear call-to-action (CTA): Encourage users to learn more, visit your website, or shop now. Make sure the CTA is aligned with the objective of raising awareness and piquing interest.
- Optimize for engagement: Choose the right campaign objective, such as “Traffic,” “Video Views,” or “Reach,” to maximize ad engagement and encourage users to interact with your content.
- Monitor and optimize: Continuously analyze ad performance metrics, such as reach, impressions, and engagement rate, and optimize your ad creative, targeting, and budget accordingly.
Create a New Campaign
Begin by making a new Facebook campaign and selecting the Awareness objective.
Facebook tailors ad delivery based on the chosen objective. For Conversions, ads reach people likely to convert, while Video Views targets those more inclined to watch videos on the platform.
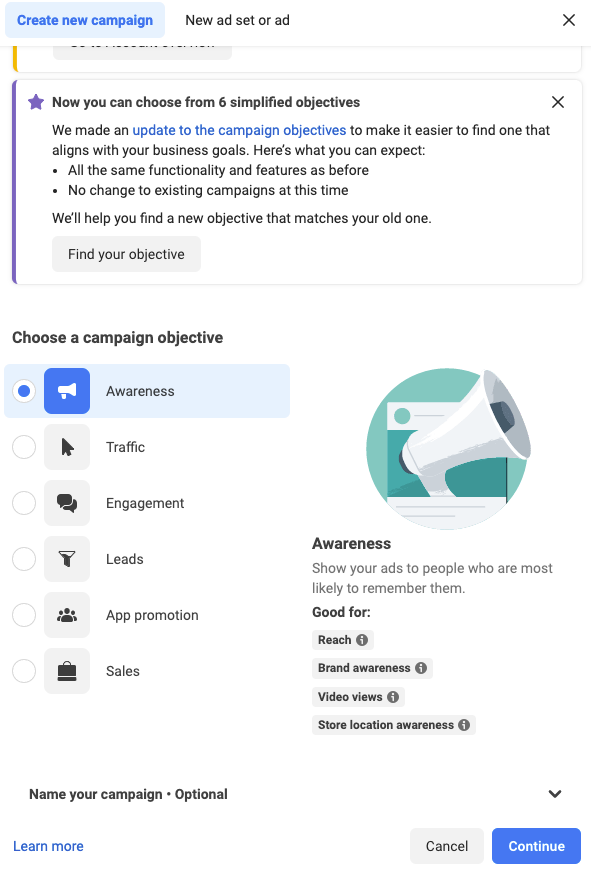
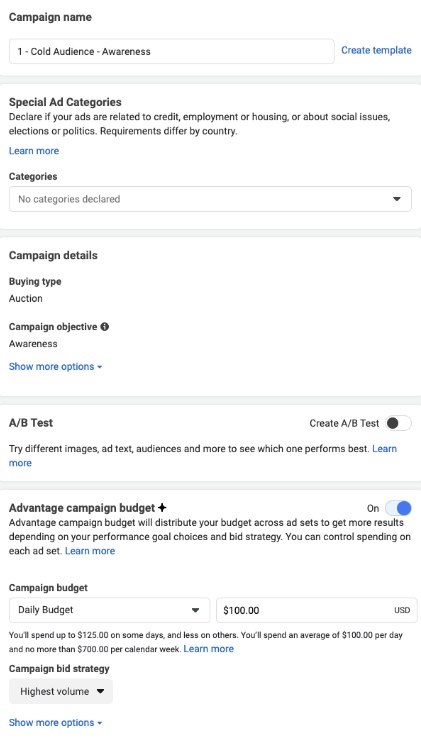
Note: Start campaign names with ‘1’ for top of funnel, ‘2’ for middle, and ‘3’ for bottom. This numbering system simplifies data filtering for different facebook marketing funnel stages when analyzing results later on.
Select the Campaign Budget option and allocate your budget. If your Facebook page and Instagram account lack engagement, assign a larger budget share to the top of the funnel. Gradually shift the budget down the facebook ads marketing funnel as engagement and website visitors increase.
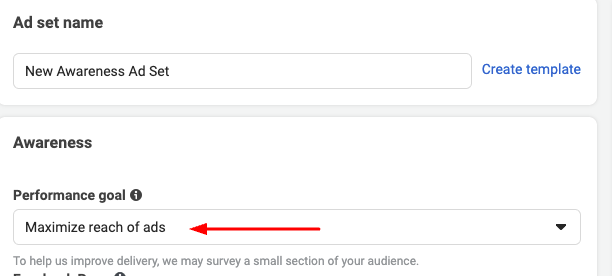
Set Up the Facebook Ad Set
You should maximize reach for your top of funnel Facebook ads. This way Facebook tries to show your ad to as many people as possible.
Design Your Facebook Ad Creative
When creating top-of-the-funnel ad designs, keep the following key points in mind:
- Brand consistency: Align your ad design with your brand’s identity, including colors, fonts, and overall style, to create a cohesive brand experience.
- Engaging visuals: Use high-quality images or videos that showcase your products or convey your brand’s lifestyle. Attractive visuals can grab users’ attention and generate interest.
- Clear message: Convey your unique selling proposition or highlight product benefits and features that resonate with your target audience. Use concise, easy-to-understand language.
- Emphasize value: Focus on the value proposition of your products or services, and show potential customers what sets your brand apart from competitors.
- Strong call-to-action (CTA): Incorporate a clear and compelling CTA that guides users to learn more, visit your website, or make a purchase. Ensure the CTA aligns with the top-of-the-funnel objective of raising awareness and generating interest.
- Mobile optimization: Design your ads to look great on various devices, especially mobile phones, as a large portion of users access social media platforms on their smartphones.
- A/B testing: Test different ad designs, messaging, and visuals to find the most effective combinations for your target audience. Use the insights gathered to optimize your ad campaigns further.
- Social proof: If possible, incorporate customer reviews, testimonials, or user-generated content to build credibility and trust among potential customers.
Step 4: Create a Middle of Funnel Campaign to Encourage Product Consideration
A middle-of-the-funnel facebook ad focuses on engaging potential customers who are already aware of your brand and products. As the second stage in the customer journey, it aims to nurture interest and build consideration. At this stage, the audience is not yet ready to make a purchase but is evaluating your offerings. Your goal is to transform prospects into leads. Since the audience has some familiarity with your products, provide more detailed information without overwhelming them.
Educational content, such as how-to guides and product demonstrations, works well for this stage. Keep in mind that you’re addressing audiences who are exploring their options. To keep them engaged, ensure content is informative and highlights product features and benefits. Emphasize the unique aspects that set your products apart from competitors, provide valuable insights, and incorporate storytelling to establish an emotional connection.
Consider using a mix of image carousels, GIFs, and short videos to showcase your products in different scenarios, making them more relatable to your target audience. This approach helps potential customers visualize how your products fit into their lives, moving them closer to making a purchase decision.
To create a good middle-of-the-funnel ad for an e-commerce brand:
- Target warm audience: Retarget users who’ve interacted with your brand or visited your website but haven’t made a purchase yet.
- Share valuable content: Provide informative, educational, or entertaining content such as how-to guides, product demos, or customer testimonials to build trust and showcase product benefits.
- Emphasize unique features: Highlight your products’ unique selling points and differentiators to stand out from competitors.
- Use engaging visuals: Employ a mix of images, carousels, GIFs, and short videos to showcase your products in various scenarios and keep users engaged.
In addition to the above steps, focus on Include a clear call-to-action (CTA) and analyze ad performance metrics and adjust ad creative, targeting, and budget, same as before.
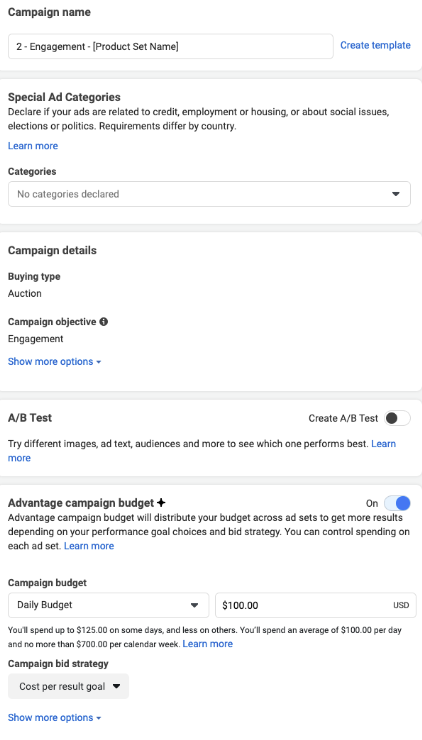
Create a New Facebook Campaign
While making a middle-of-funnel campaign, choose the Conversions objective and give your campaign a name, like “2 – Purchase – [Product Set Name].”

Determine your budget according to your Facebook/Instagram engagement and website visitors. More engagement allows for a higher budget in the middle of funnel ads.
Click Continue when finished.
Set Up the Facebook Ad Set
In the Ad Set part, pick Engagement for Campaign Objective option.
Choose these audiences for ad targeting:
- 180-day Facebook page engagers
- 180-day Instagram business profile engagers
- 180-day website visitors
Design Your Facebook Ad Creative
Upload videos or images for your ad.
Begin the main text by asking a question your ideal customer would say “yes” to, drawing them into reading more. Explain how your product solves their problems.
Finish the main text with a strong call to action, like “Shop Now: [Your Website URL].”
Write an eye-catching headline for your target customer. Add your website URL and choose “Shop Now” as the call to action.
Step 5: Create a Bottom-of-Funnel Campaign to Sell Your Products
A bottom-of-the-funnel ad targets potential customers who are ready to buy from your e-commerce brand. As the final stage of the customer journey, it aims to drive conversions and sales. At this stage, the audience is familiar with your products and needs a nudge to make a purchase.
Focus on showcasing special offers, discounts, or limited-time deals to create urgency. Use clear, persuasive messaging that reinforces your product’s value and encourages the final purchase decision.
Employ a mix of product images, customer reviews, and testimonials to build trust and credibility. Ensure your call-to-action (CTA) is strong, like “Buy Now” or “Shop Now,” to guide users towards completing their purchase.
Create a New Facebook Campaign

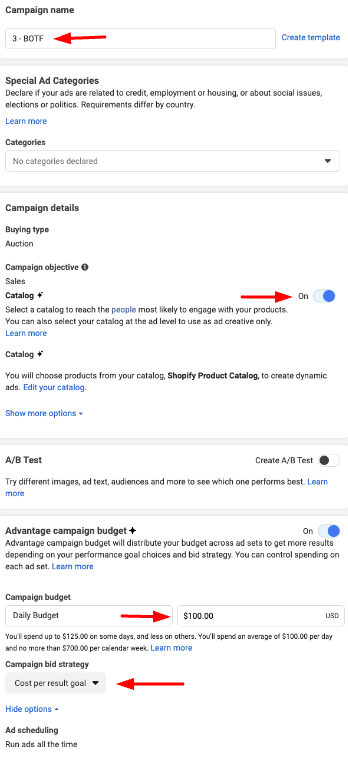
Set Up the Facebook Ad Set
For the ad set, choose All Products or a specific product set to promote.
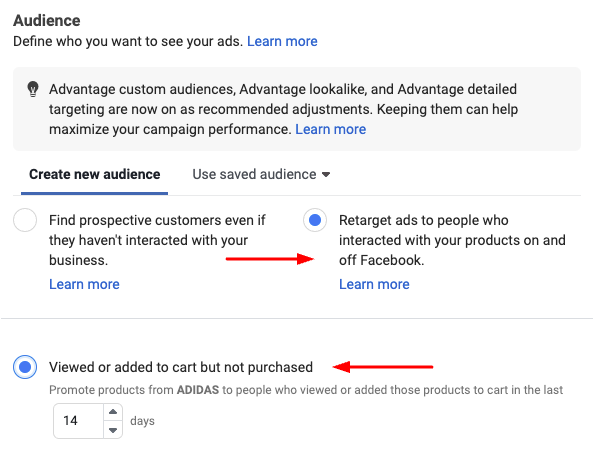
In the Audience part, pick the option to Retarget Products to People Who Visited Your Website or App.
Then, choose Viewed or Added to Cart But Not Purchased, and put 14 in the Days box (test this number based on your website visitors).
For Placements, choose Advantage+ placements to let Facebook optimize placements automatically.

Design Your Facebook Ad Creative
At the Ad creative, choose details from your products directly as shown in the image below.
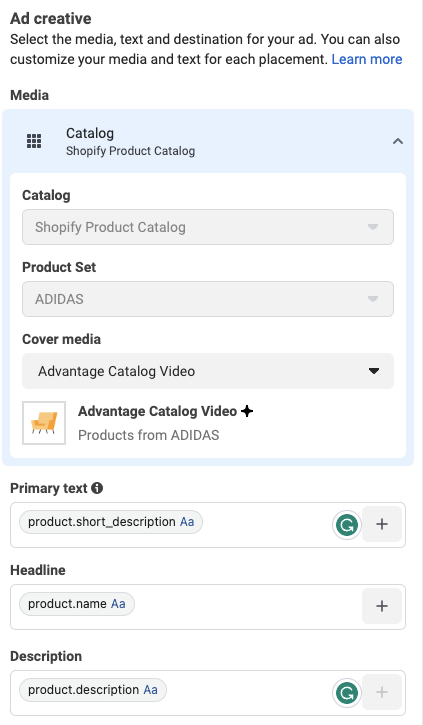
In the ad’s main text, ask customers to return and finish buying. Under See More Display Link, include your website URL.
Choose Shop Now for the call to action. Click Review and publish the ad.
Step 6: Set Up Remarketing Campaigns
Remarketing campaigns target people who have bought from you before, visited your website, or didn’t complete a purchase. The goal is to keep them connected to your brand. Use middle-of-funnel campaigns to engage past customers.
Inform past customers about product updates through conversion campaigns.
After 60 days from their purchase, make an ad campaign for past buyers. Then, create new ads for this audience after 180 days of their engagement.
Focus your ads on customers whose products are almost finished, reminding them to buy from your brand again.
Curious about retargeting? Read more about it here.
Target Past Purchasers With a Product Launch Campaign
When launching new products or updates, announce them in a conversion campaign for past buyers.
Make a new middle-of-funnel campaign for those who purchased in the last 60 days. Test different images and videos to find the best performers.
Once you know what works, copy those ads for the 180-day engagement audience.
This helps build social proof for new products. Show the launch to past buyers first, then target the 180-day engagement audience with the best-performing ads for those who haven’t bought yet.
Target People When Their Product Is About to Run Out
Make a new middle-of-funnel campaign for people whose product is almost finished. Remind them to visit your site and reorder.
For example, if you sell consummables such as food items that last around 60 days, create a campaign targeting buyers from 45 days ago, but exclude those from 25 days ago. This encourages them to purchase again.
This campaign reminds people to reorder their favorite items when it’s time. You can make a similar campaign to target one-time buyers, persuading them to sign up for a monthly subscription to your product.
Driving Customers Through Your Facebook Sales Funnel
Creating a FB sales funnel can vary for each brand or advertiser. It’s crucial to experiment and discover what works best for your brand.
Pay attention to how people react to ads from the top-of-the-funnel to the bottom. Keep making new versions and testing them to get the best results. Copy the ads that drive sales to make more money.
Your goal is to keep the audience interested, so it’s good to be creative with your ads.
The Ad funnel on Facebook is a great way to find the product that connects best with your target audience.
Frequently Asked Questions
Do Facebook Ads work for ecommerce?
Facebook Ads work for e-commerce brands by helping them reach potential customers, promote products, and increase sales effectively. Facebook ads are a key way for major e-commerce brands to make most of their money.
Which Facebook ads are most effective for ecommerce?
The most effective Facebook ads for ecommerce usually include eye-catching images or videos, a clear call-to-action, and a focus on the product’s benefits. Carousel ads, video ads, and dynamic product ads often work well.
Why is the marketing funnel important?
The marketing funnel is crucial because it guides customers through their journey from discovering your brand to buying. It helps target ads effectively for each stage, optimizes your ad budget, and strengthens customer relationships by providing the right information at the right time.
What is the benefit of a sales funnel?
A sales funnel drives your sales effectively by helping you in identifying the leads. It makes it easier for you to convert these leads into sales and then keep track of the progress of the marketing campaigns.